I have made it. I was able to finsh the complete electric wiring of the car.
Everything is testet and is OK.
As I am working daily with harness and cables, I was afraid, that I misjudged the amount of work to do a complete new wiring harness for this car. Even as the Mantula is not a electrically complex car.
OK, some geeks were not really neccessary, but this is my own stamp on this electrical job ;-)
Thats the result:
Behind the dashboard it looks like this:
A little bit caotic, but much less than before...including the 60mm tube for the fresh air.
Behind the dash I used spiral hose to cover the wires. It is much faster to apply than the monofilament tube used in the engine bay. When the harness goes through the plywood I fixed them with a cable tie so they can´t move and scratch.
The green cables are for the heated screen. The rolled up ones in the middle are for reserve.
Inside the glove box:
Looks even more caotic, but it will be covered with a glove box carpet. The Bluetooth line adapter connected on the first time with my mobile and I enjoyed brutal sound from the rear - hope that was only the beginning of good sound...
You notice the light in the glove box ? Cool eh...? Switched on from the panel on the left.
The other switch is for the ambient driving light in the foot area.
The third switch is to activate the foot area light in full power when a door will be open. Gimmickery.
The two potis are for the gauges ilumination and for the ambient foot area light.
The drivers side can be removed by unplugging the dash:
I used a 17W2 Dsub connector, means 15 pins for signals and 2 pins for high power up to 30 ampere. This is for the coil power after it has passed the RVI speedo meter.
I have added one signal lamp to the original setup. I want to have a warning lamp for low oil pressure.
And here another cool thing I have seen on a English car:
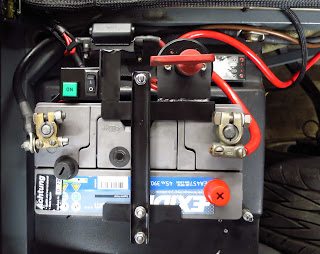
A engine starter button inside the engine bay.
As I have no stereo the ignition switch position on the left turn is useless.
Now it has a new function. If the ignition switch is turned left, the I/O switch in the engine bay will get power and the ignition can be switched on. Then the green ON button will start the engine.
No climbing inside every time to start or stop the motor.
You noticed the black color ? The polished stainless steel did not meet the style in the engine bay.
Much better now.
Here the front lamps:
If someone is interested on the wiring shematics - drop me a note and I will send them... They look a lot different than the ones I posted before.


Hi! Very interesting to follow your work, looks great! I have a Mantula from 1989, and I am interested on the wiring shematics. Would it be possible for you to send one to me?
ReplyDeleteRegards,
Lars